


We all make responsive web sites nowadays and for a new project I was working on I needed to make a multi-platform mobile application. Cordova was the obvious choice for the skills that I have. I wrote this post just to keep a note of some of the tools and technology I used and documented some of the bigger issues I encountered.
Differences between Cordova & Phonegap
A common source of confusion and something I hear a lot is: What is Cordova and how is it different to PhoneGap? My understanding is Phonegap was originally developed by Adobe and as they did with flex, donated the codebase to Apache to maintain in 2011. At this point Adobe kept hold of the Phonegap name, so Apache needed to come up with a new name - Cordova. So you can think of Phonegap as a distribution of Cordova, similar to how Safari uses webkit. At the point of writing this Phonegap and Cordova are identical but there is nothing stopping Adobe using the base Cordova codebase and augmenting it with their own tech at some point.
How Cordova Works
Cordova applications make use of exisitng web technologies to build mobile apps but differ from mobile web applications in that they allow access to the devices’s hardware.
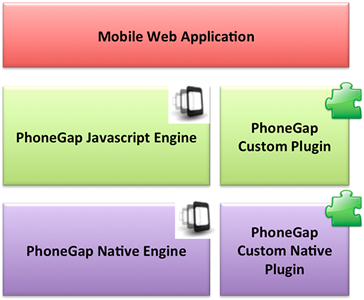
Within a Cordova application you have a native WebView which is occupying the full screen of the device and acts as the container for your app. This is where the html, js and css is rendered. Hardware and native functionality from the device is split up into plugins. Each plugin provides a partiular native function, for example the Camera plugin provides, you guessed it, function calls to use the camera and grab images.
A Cordova plugin is made up of two parts. The JavaScript public api that is called by the application developer and the back end native code that is called when that plugin is invoked. All native functionality is called via the Javascript api, for Example making use of the camera in a Cordova application can be done via this call.
navigator.camera.getPicture(
    function(imgData) {
          var image = document.createElement('img');
          image.src = "data:image/jpeg;base64," + imgData;
          _this.attachments.append(image);
    },
    function() {
    	console.log('and error has occurred');
    }, {
      quality: 20,
      destinationType: Camera.DestinationType.DATA_URL
    }
);
So you have your back end Objective-c or Java code (or whatever’s the language of choice for that platform) for the plugin and a JavaScript method that invokes it. How does the JavaScript call make it’s way to the native code and then back again? This is done by creating a specially encoded request that is intercepted via the Cordorva application and is then routed through to the correct plugin. The Cordova application then sends a response or the calling application’s web view. For more information you can see the android implementation here and the ios implementation here. As you can see the implementation varies for each platform. The diagram below shows the different components that make up the Cordova platform.
Differences between web and hybrid development
Whilst you are still technically developing a web page using standard web technologies with Html, JavaScript and Css there are differences that you should be aware of. These are some of the main things I think are worth mentioning:
-
All apps should be single page applications. The main reasons for this is that, firstly all apps must wait for the
devicereadyevent before any functionality can be used. Also every time a web page is loaded into the WebView it will need to load all the scripts you are referencing again. Using seperate pages will reduce the speed of your application significantly and as you are trying to mimic native perfomance causes usability problems as well as perf issues. -
Offline. In general, it is very rare (although it is becoming more of a thing) for a web site/application to need to work offline. It’s more normal for mobile apps, especially tablet apps to work offline and your application should be able to handle this. I recently read an article online that used the phrase “offline first”. The browser Network Information api is not supported much at the moment but luckily there is the Network Information cordova plugin to make things a bit easier.
-
Touch Events. Whilst most platforms are starting to remove or at least shorten the delay, there is usually a delay of about 300ms before click events are fired on mobile WebViews. Using the touch events instead removes the delay which in turn will make your application more responsive, which is awlays a good thing.
Getting Cordova
If you have node and npm installed then installing Cordova is really simple. Just run the command:
$ npm install -g cordova ios-sim
THis will install cordova and the ios-sim bindings which allow you to open up the ios simulator with the command line. Once cordova has installed it will also give you a command line tool that will allow you create and manage your Cordova applications (add platforms and plugins, create apps etc). For example creating an ios app with camera support can be acheived with the following commands:
$ cordova create myapp com.example.MyApp
$ cd myapp
$ cordova platform add android
$ cordova plugin add https://git-wip-us.apache.org/repos/asf/cordova-plugin-camera.git
$ cordova build
$ cordova emulate ios
After running the last command you should see the ios emulator with the default cordova application showing.
Ionic Framework
Ionic is a framework that sits on top of Cordova. It bundles together some pre-existing web technologies into one package, making it easier to develop applications.
I decided to use Ionic as it automated some of the simple tasks for me and provided some out of the box mobile styles that were useful. Ionic takes Cordova and adds some extra tools and styles to make development easier. It uses sass for the styles and automatically sets up gulp to compile them. It also uses Angular as the framework for the single page app. To install it run
$ npm install -g ionic
Then creating a basic application with a side menu is just a matter of running:
$ ionic start myApp sidemenu
This creates you a gulp process that builds your app, some sass files for styling and a basic angular router and some controllers for you to start. Testing the application in the desktop browser can be done with the ionic serve command. Simply run:
$ ionic serve
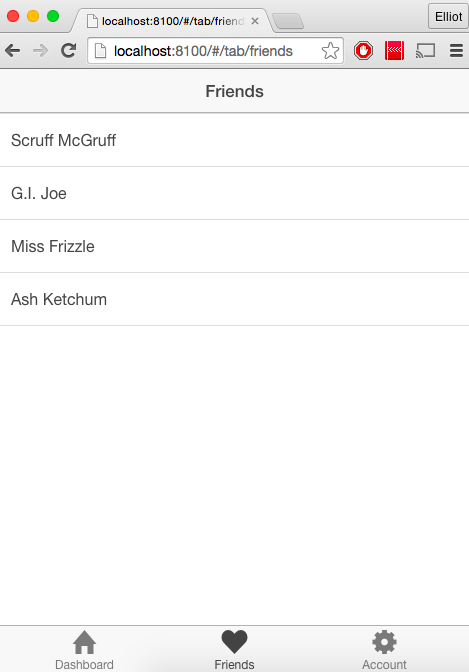
This runs up a web server and opens your browser to the built application. It also has live reload enabled so will automatically compile your app with every change which is always nice. Below is a screenshot of the basic ionic app running in a browser.
Then once your happy with the look of the app you can compile and test on the emulator with:
$ ionic build ios
$ ionic emulate ios
Deploying your application
Once you have tested your application in the emulator your going to need to test and ultimately deploy to real devices. In order to get your application running on hardware you are going to need to sign your app. The documentation on this process is particularly light and I had quite a bit of difficulty working out the correct procedure. Each platform has a different set of steps on I have documented my process for android and ios below.
Android
The process for android is slightly more straightforward than it is for iOS. Firstly you need to create or obtain a keychain. If you don’t have one then you can create one by running the following command
$ keytool -genkey -v -keystore my-key.keystore -alias alias_name -keyalg RSA -keysize 2048 -validity 10000
Then once you have a keychain you can sign your release apk using the following commands
$ jarsigner -verbose -sigalg SHA1withRSA -digestalg SHA1 -keystore {KEYSTORE_LOCATION} {APK_NAME} {ALIAS_NAME}
- {KEYSTORE_LOCATION} THe filepath to the keystore location.
- {APK_NAME} THe name of the apk to sign.
- {ALIAS_NAME} The alias name of the store to use.
You then need to align your apk which can be done with the following command.
$ zipalign -v 4 {UNALIGNED_APK_NAME} {OUTPUT_APK_NAME}
- {UNALIGNED_APK_NAME} The name of the apk to align.
- {OUTPUT_APK_NAME} THe output name of the apk.
The application should then be installable on all devices. You should also be able to submit it to the android store.
iOS
First of all you are going to need a certificate and a provisioning profile. If you don’t already have these files then you will need to sign up to Apple’s developer program. Once you have them you need to install your certificates into your keychain. You can do this with the following commands:
$ sudo security import /path/to/distribution.cer -k /Library/Keychains/System.keychain
$ sudo security import /path/to/distribution.p12 -k /Library/Keychains/System.keychain
You can then convert your app file into a signed ipa with xcrun and xcodebuild. The following commands will create you a signed ipa.
$ xcodebuild -project {XCODE_PROJECT_FILE} -arch armv7 -target {PROJECT_NAME} -configuration release clean build CONFIGURATION_BUILD_DIR="{PROJECT_PATH}/build" CODE_SIGN_IDENTITY="{CERT_NAME}"
This will sign your app file using the certificate you added into the keychain earlier. Once complete you need to convert to an ipa and embed the provisoning profile. THis can be done with the following command.
$ xcrun -sdk iphoneos PackageApplication "{RELEASE_BUILD_DIR}/cordy.app" -o "{RELEASE_DIR}/cordy.ipa" --embed {PROVISIONING_PROFILE_LOCATION}
- {RELEASE_BUILD_DIR} is the absolute path to the folder your application resides in. Note it has to be absolute as relative paths don’t seem to work particularly well.
- {RELEASE_DIR} is the absolute path to the folder you want to save your ipa file.
- {PROVISIONING_PROFILE_LOCATION} is the location where your provisioning profile can be found.
Once complete you will have an ipa file that will be installable on all devices defined when creating your certs and profiles in your developer account.